
Another day, another chance to stretch my sewing skills in a new way. I’m continuing my journey into sportswear/swimwear with yet another pattern that needed some serious full-bust adjustments.
Today’s addition to the club is the Billie one-piece from Edgewater Avenue. I want to start by saying that I really, really, really want to like Edgewater Avenue’s patterns. Their instagram page and their tagged photos are just full of stylish, on-trend, really fun and clever swimwear designs – I want to achieve that look! I want to be part of that club!
However…
My experiences up until this point with their patterns have not been the easy-breezy lemon-squeezy experience I was hoping for (and that some captions on instagram make them out to be). Thankfully this experience bucked the trend and I am now feeling like I can be part of the trendy and stylish “I made my own hot swimsuit (pole wear) club”! It’s a very exciting development!
I have a few of their patterns (mostly picked up in their $5 Friday Sales). My first experience was with the Talia one-piece, which I bought full price and which I really wanted to be able to make work for me. Unfortunately, I was a little surprised when I opened the pattern files – the instructions were sparse, to say the least. I was aware that the size range wasn’t super inclusive (XS-XXL, full bust range 76in-106, high hip range 81in-111in, B-cup only) but for AUS $25 I was expecting a little more than, “sew the seams together”. To be fair, each pattern comes with an accompanying YouTube video but I was expecting the written instructions to be a replacement for the video, not a condensed accompaniment. I much prefer written instructions to a video and it always irks me a little to buy a pattern and then find out you have to sit and watch a 30min YouTube video to find out how to sew the damn thing together.
My other gripe with the instructions is that the materials list is concerningly limited, in my opinion. Maybe not something that matters to experienced swimwear sewists, but really threw me when I opened up the instruction document and saw non-specific descriptors like:
- 1 yard material and lining (is that 1 yard for outer material and lining total? Or do I need a yard of each? Does it make a difference if I self-line versus buy a specific lining fabric?)
- Swimwear elastic (no quantity guidelines on that – just a statement that you’ll need it. Are we talking like 20cm or like 4m?)
Again, for $25 I was expecting a little bit more than that. I’ve never made swimwear before – how on earth am I meant to know how much elastic you need for a swimsuit? Through some digging, the designer does actually provide more guidance on materials through the YouTube video and even has a 3-part series on elastic (which was very helpful) but again, not at all useful when I’m standing in Spotlight feeling overwhelmed by elastic options.
Then when it actually came time to make the swimsuit, it obviously fit horribly (i.e. not at all) in the bust due to it being drafted for a B-cup. With no guidance from the pattern in any way about adjusting for different bust sizes, combined with my limited knowledge on making swimwear and FBAs on knit fabrics it all seemed impossible and overwhelming and that attempt was sadly discarded. Not necessarily the pattern’s fault, as my J-cup bust is so very outside the drafted B-cup, but disappointing that I felt so lost and confused that I didn’t feel like I could persevere and problem-solve my way through it.
But, a year plus later, a new machine (that handles stretch fabric so much better) and a few successful attempts at knit fabric later (including this pole set), I was ready to try again. I picked up a few patterns for $5 (AUS $7), knowing in advance the instructions were sparse and that I would be on my own in terms of FBAs and bust-fitting. Knowing that, $7 feels about right for these patterns – there’s a lot you have to fill in yourself (especially if you are not the body shape or size the pattern was drafted for but at the end of the day, they are really cool designs and there are some ingenious burrito construction methods that give a really clean, seam free finish.
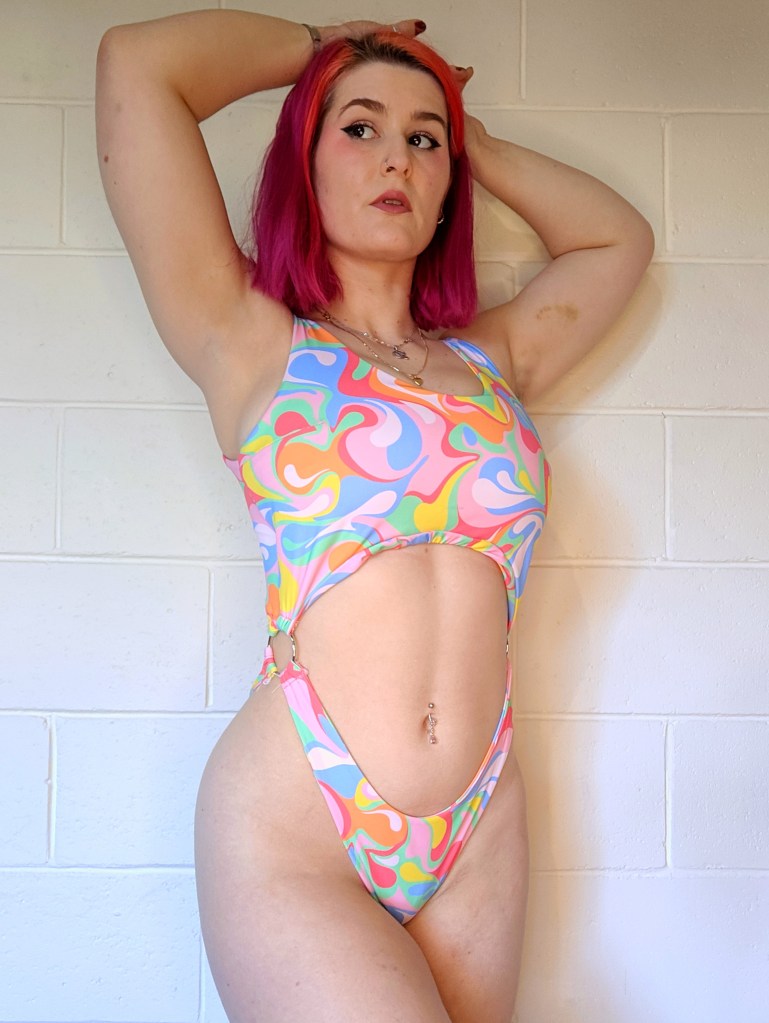
I’d been advertised this bodysuit recently and thought the Billie one-piece would be the perfect pattern to try and recreate it. I love the design and seeing as the top of the Billie was already fairly full coverage (especially without the optional twist) it seemed like it wouldn’t be too much work to adjust for my 28J bust. For once, I was right – it was not that difficult AND it turned out great.
construction notes
Pattern: Billie one-piece by Edgewater Avenue
Fabric: Swimwear fabric from Spotlight (75% nylon, 25% lycra, 220 GSM)
Size: M, with 1in FBA (should have done 2in). Sizing put me between the medium and large, but decided to size down for a snugger fit
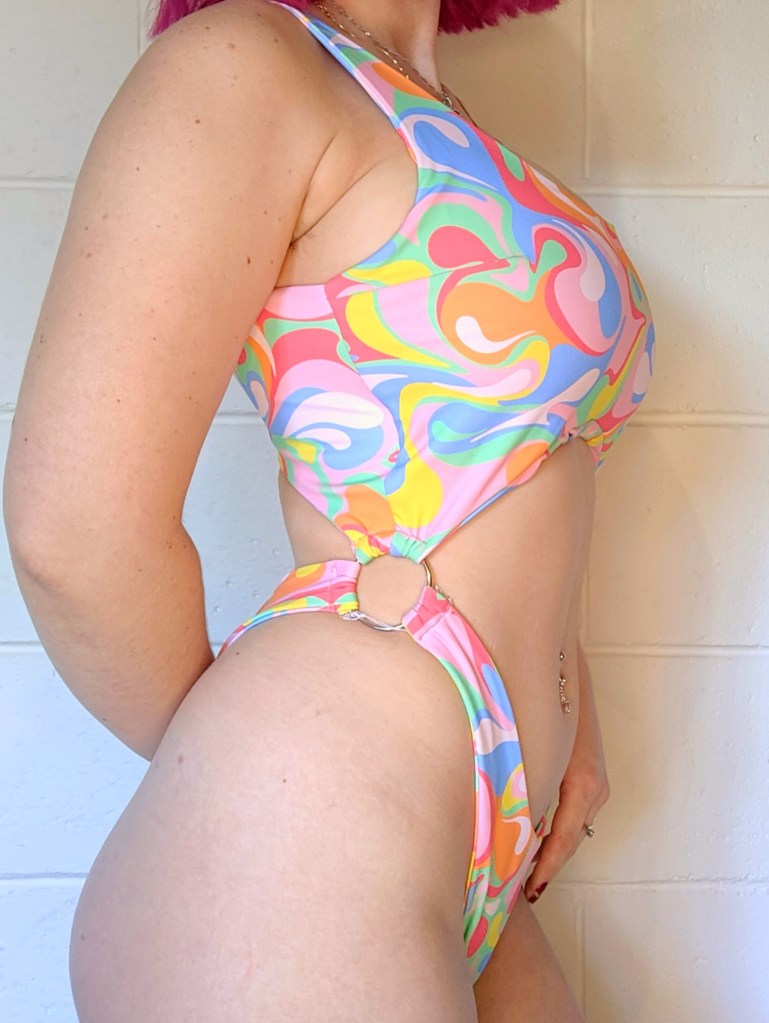
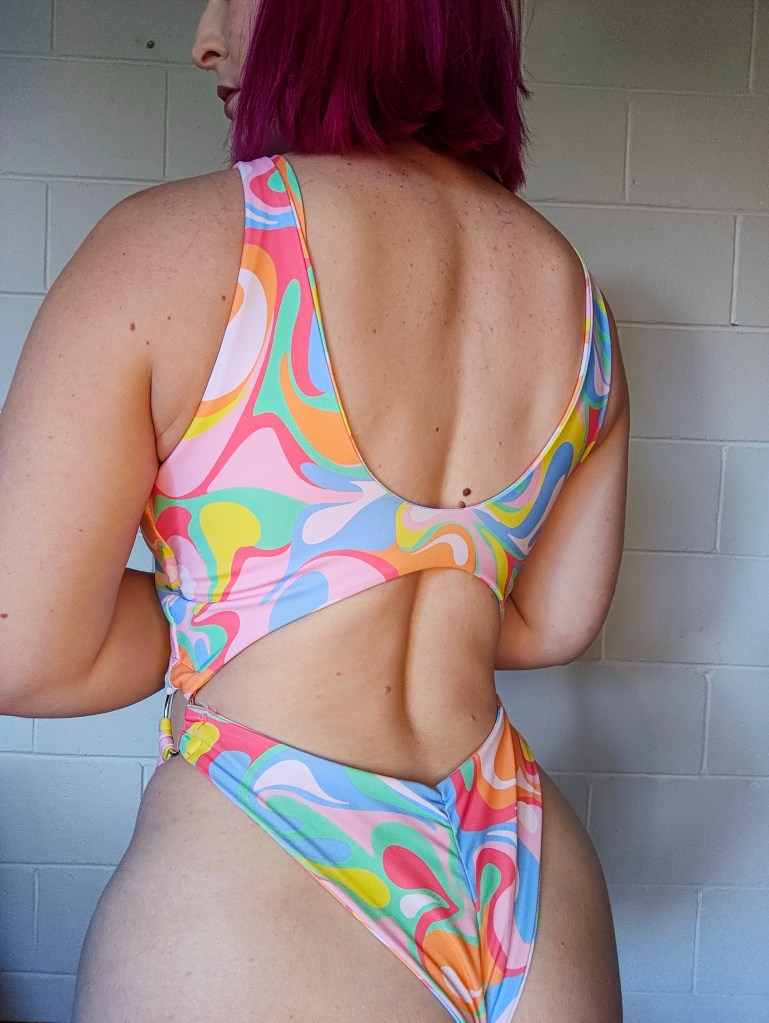
bottoms
The bottoms were definitely the easier half of this bodysuit – they were made pretty close to as drafted, albeit with a lot of what felt like very small adjustments:
- Added 0.5cm of coverage to front and back crotch. Knowing I was planning on poling in this outfit I didn’t want to take any chances with lack of crotch coverage.
- Removed hip coverage at front and back – as I was going to attach the sides to rings, I just kinda of eyeballed re-drawing the hip line and shaved off as much hip coverage as I thought I needed. I ended up with the sides of the front and back pieces being about 1.5in wide and this was perfect.
- Removed ~2in off the front rise. This was a change I made after trying them on for the first time – absolutely nothing wrong with how the rise was drafted, I just personally prefer a lower rise.
- Added elastic to the middle of the back piece for a scrunch-bum effect (which I do for all my pole pants) but in hindsight, because of the ultra high leg and the “cheeky cut”, it was completely unnecessary.
- Added elastic (on stretch) to the front leg openings but not to any other seams. The instructions tell you to add elastic to all seams, but not to apply the elastic while stretched. To be honest, I really didn’t understand why you’d add elastic to a seam but not have it stretched so I decided to just skip that (also I didn’t really have enough elastic to add to all the seams). I found the front leg openings to be a little shifty for my comfort without the elastic – with a leg opening that high, I do not want to risk fabric moving when it shouldn’t. I used elastic about 1.5in shorter than the seam length.
Construction wise, they were really easy to make – I really like the burrito method of construction that leaves you with no visible seams. Big tick all round really.
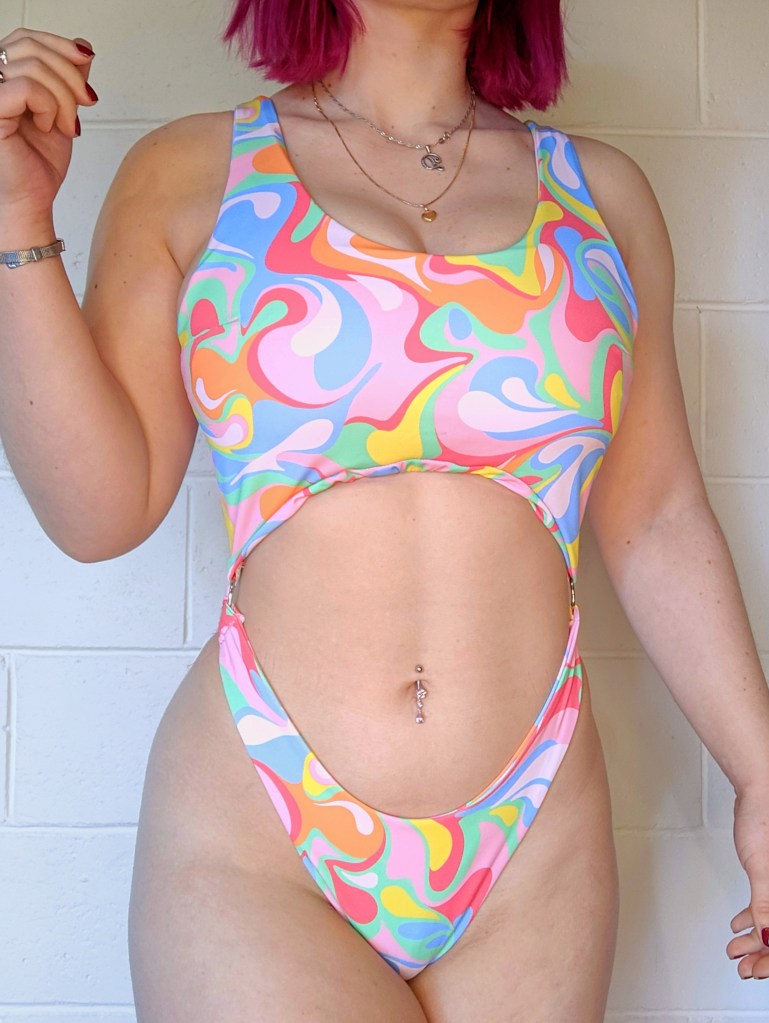
top
The top definitely took more work than the bottoms but still came together blazing fast compared to everything else I’ve made recently. The only changes I made were full-bust related adjustments and other than that, it’s essentially straight out the packet and as per the instructions. Adjustments I made to the top were:
- Darted FBA of 1in – definitely should have done more, but this was the first time I’ve ever done an FBA on a compressive knit fabric and was thrown by google telling me to add much less to the FBA than I would on a woven.
- Added ~0.5in coverage at top and bottom of the front of the top – could have added a bit more at the top but I think that my slight issue of boob explosion at the top would also be improved with a bigger FBA
- Added powermesh to front and back – this is an absolute non-negotiable and has been a game changer for me in sewing garments like this. Adding that extra layer of support and compression has really made a massive difference in getting patterns like this to work for my bust size.
- Added a 1in elastic under bust band to the lining of the front top piece – this was the only adjustment that didn’t turn out super well, but I definitely think it’s something to work on for next time. I was concerned about the style of the top not being supportive enough underneath my bust and figured that I could attach a piece of elastic (on stretch) to just the lining as a faux-bust band / inbuilt shelf bra sort of idea. To it’s credit, it definitely did work functionally – I feel a lot more supported than I did without it. However, it unfortunately makes the lining roll to the outside, creating a wrinkled look at the underbust (it unfortunately has some secret butthole energy to it). I think this would be fixed by attaching the elastic closer to the seam allowance. I just eyeballed where to sew it on but think that I’ve attached it too high, which is causing the lining to roll to the outside.
- No elastic on any seams – maybe this is lack of understanding on my behalf, but as per the bottoms I genuinely couldn’t figure out what benefit it would add so I just left it off and saved myself the effort.
In terms on construction, it again came together very easily but the burrito method of attaching it all together did make it really hard to make adjustments as you go. Essentially, you sew it all together inside out (with the back piece sandwiched between the two layers of the front) and then turn it right sides out by pulling it all through one of the quite small tabs at the bottom. Result looks great, but turning it was stressful. Once I had successfully turned it and realised the rolling issue under the bust, I was not confident in my ability to re-turn it to make any adjustments. I guess the trade-off is that it’s a pretty speedy sew and with low fabric requirements so if something went horribly wrong, you’d be able to re-cut and sew without too much fuss. Clearly, I didn’t think it was worth that much effort to fix. If I make another one, I’ll definitely change the elastic positioning though and see whether that solves the issue.
conclusions
Overall, I’m really happy with what I achieved. This sort of sewing is still very new to me and I’m still definitely at the stage where I really feel like I need every single win I can get to prove to myself this is doable. I feel like I’m flying a little blind with the amount of adjustments and modifications I have to do to each top to make them fit my bust size, which doesn’t help the stress levels, but it really makes the satisfaction and joy of each win even sweeter.
I do wish there were more designers offering patterns like this – I will persevere with Edgewater Avenue patterns because I have proven I can make some of them work, but I wish that was not the only option available to me. It would be nice to be able to pick up a pattern and sew without having to alter half the pattern pieces before I ever start but until that happens, I’ll just keep documenting my notes and process and hopefully they’re helpful to more than just me.

Leave a comment