
Welcome back. We’re here again.
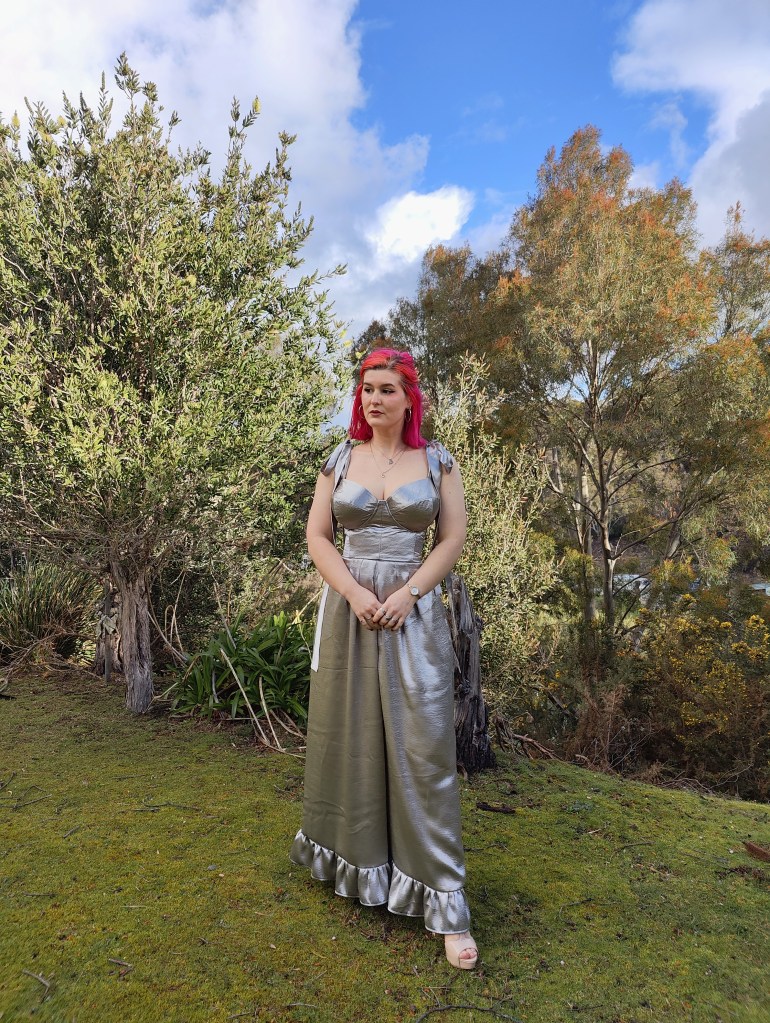
This time, we’re at the end of this absolutely mammoth journey and it’s time to actually sew the dang clothes. For those that need a recap, I have a wedding to go to and nothing in my closet that fit the dress code. Being a sewist, I thought it would be easy to whip up a vision of elegance in pebble satin and wow everyone in my slinky bias cut skirt and strappy top. Considering this is now a three part series (part 1, part 2), it was clearly not that easy.
The Vision
Just to summarise where we started and what I was actually planning on attempting, I had decided to cut my losses with the Calvin Crop and move on from the vision of the bias cut slinky skirt and (appearingly) wispy style of the top that had originally led me down this rabbit hole. Instead, I my plan was to switch out the skirt idea for a pair of big-ass pants, which always make me feel stylish and comfortable and embrace the really structured, form-fitting design of the Rose Cafe Bustier. Also, making separates always increases the chance that I’ll re-wear both items, which is definitely a plus. Thankfully, I already had a tried and tested pants pattern to use, so I could focus the majority of my energy on the ambitious style of the top.
construction notes: top
Pattern: Rose Cafe Bustier Dress by Daria Patternmaking (updated version with expanded sizing)
Fabric: Pebble satin (outer), cotton duvet (lining)
Size: Size 2, graded to size 6 in the waist, G-cup
I’ve already discussed (in length) the way this pattern is designed and instructions are communicated so in this post I’ll be focusing on my experience with the actual construction of this top.
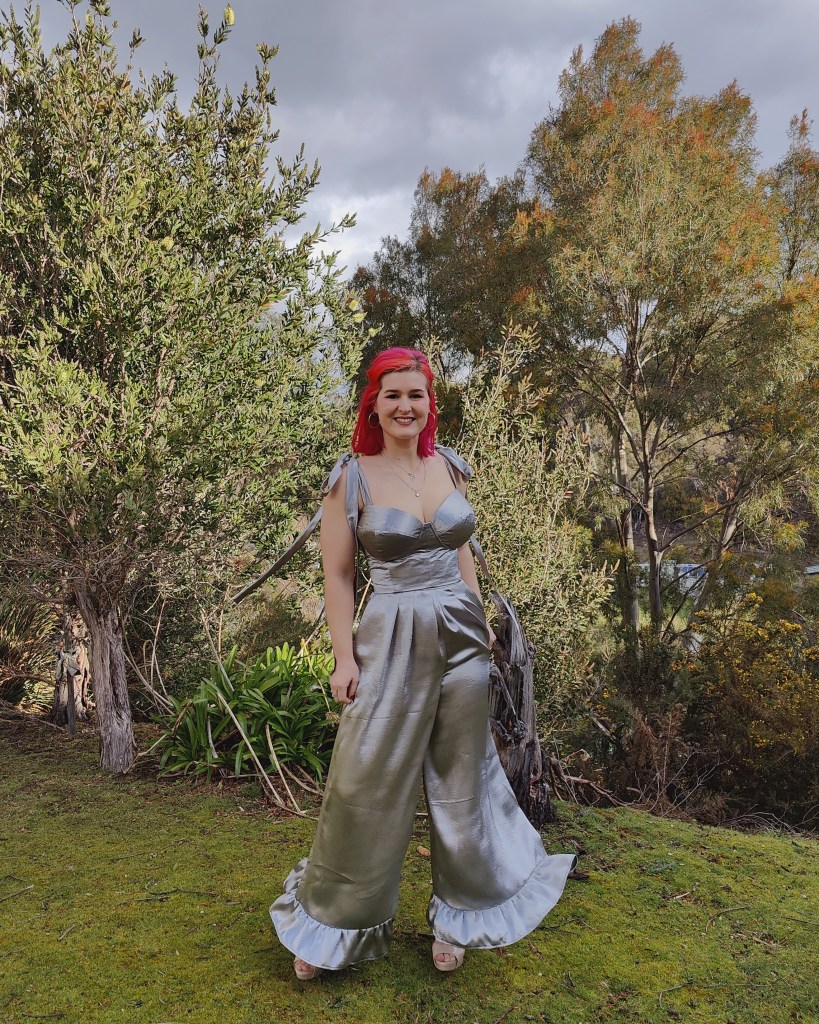
I made a few modifications to this top, the biggest of which was making it a top, and not a dress (I just slip-stitched the bottom edges together for a neat edge). Other changes I made were:
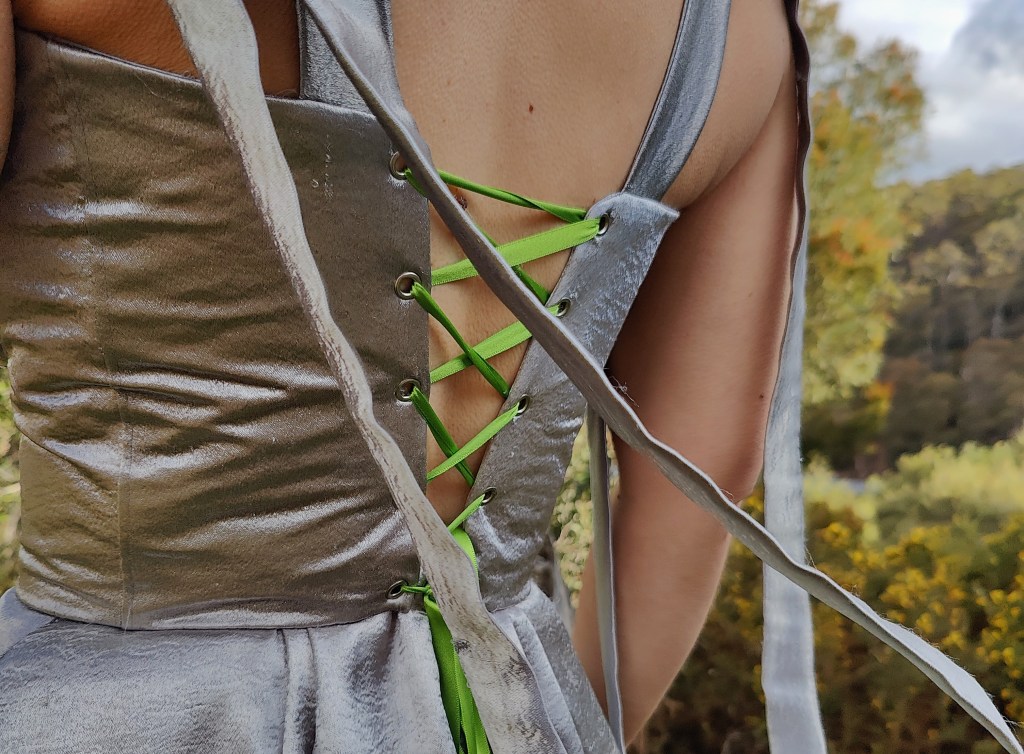
- Added a lace up back: The pattern calls for a zip but I added 5 eyelets down each side to create a strappy, lace up back. Because I deliberately wanted a lacing gap, I left out the centre back piece and instead extended the side back pieces by about 2in. The result was a top that was 3 inches smaller at the waist than the final garment measurements of my size.
- Added cable-tie boning: I added the boning to all seams in the bodice lining and split the front piece into two so that I could add boning at the centre front as well. I also added boning in the back piece, about an inch from the edge – not sure exactly where I picked up this trick but makes a big difference in stopping the edge from crumpling/folding when the lacing is done up tightly (which it definitely is for this top). I’ve never used actual boning, so I can’t comment or how much better it would be than cable ties, but I’ve always found them to be cheap, easy to get my hands on and give enough structure and support for my needs. I also had to cut all the lining pieces with a little extra seam allowance to accommodate the boning – the provided seam allowance is only 3/8in, which is crazy small in my opinion.
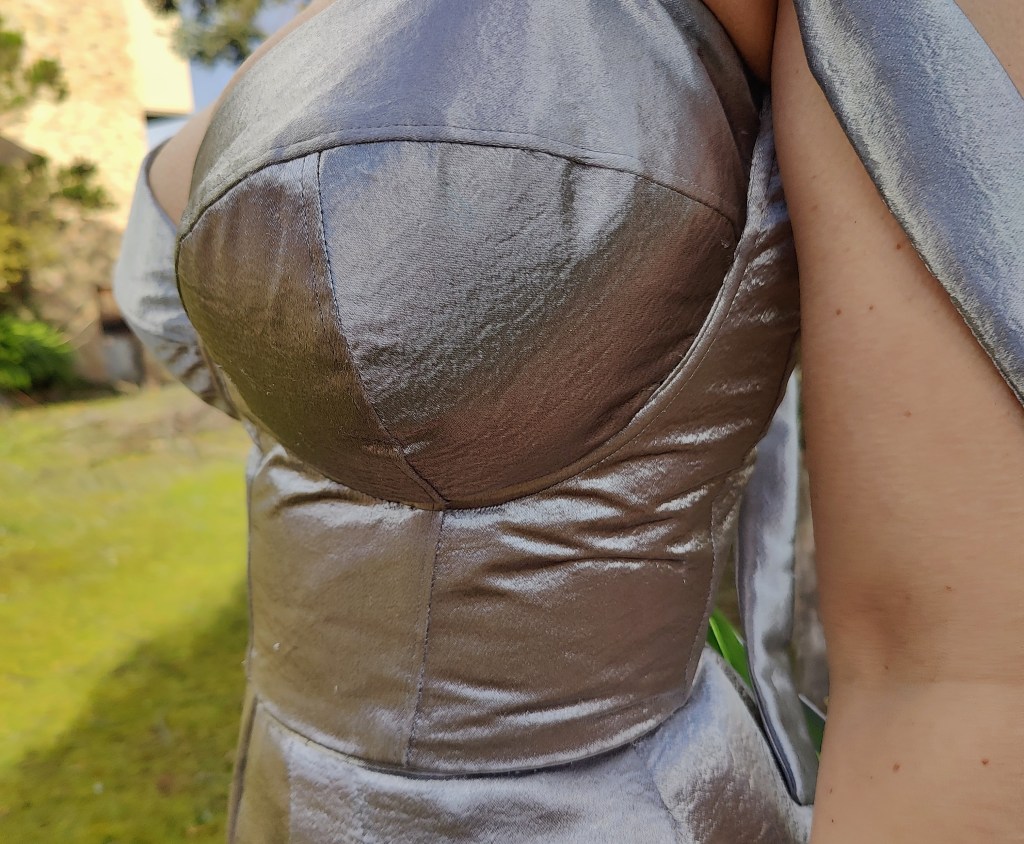
- Added underwire: This is an optional extra included in the instructions, however if you are as endowed as me in the chest area, these are definitely not optional. The difference between how the top fit with the underwires vs without was insane. Huge confidence in my sewing the moment they were installed. This was my first experience buying and using underwires in my sewing and it was definitely not as difficult as I feared it would be.
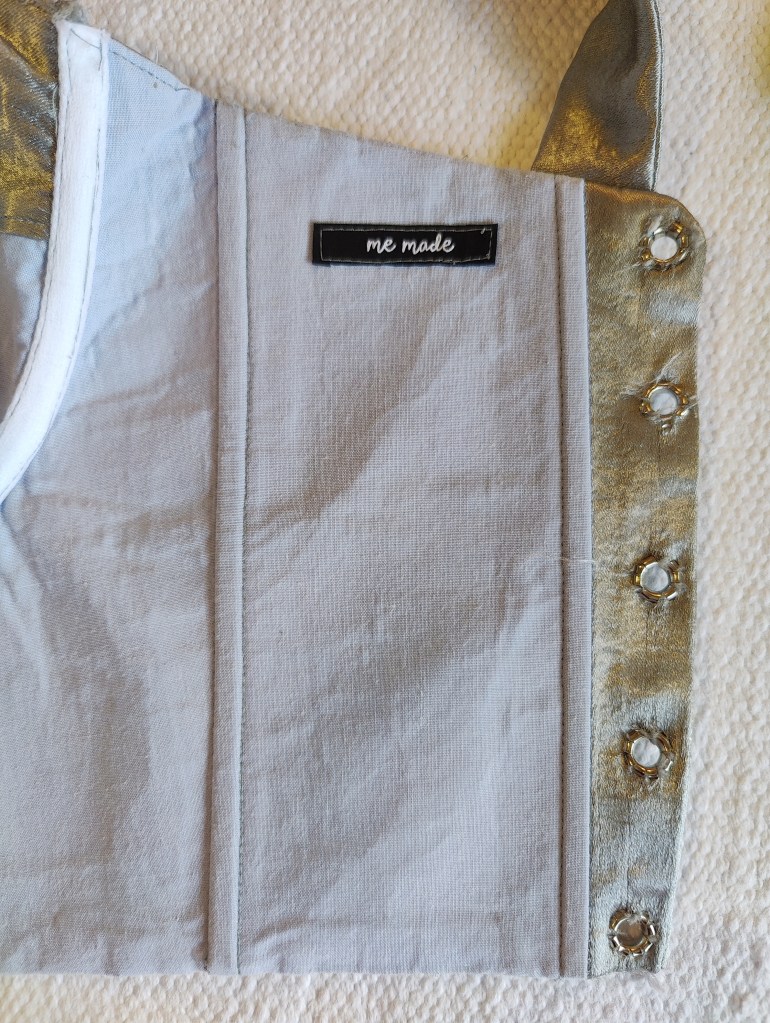
- Interfaced both lining and outer: The pattern only calls for interfacing for the outer pieces but I wasn’t taking any chances – I got the most heavy duty interfacing I could find and interfaced the hell out of every single piece. This thing is so stiff it basically stands up on its own.
- Fabric straps: The pattern calls for ribbon to be used for the straps but I used fabric instead. Instructions call for 2.2m of ribbon total (no width guidance) so I just winged in terms of how wide and long I wanted the straps to be. I ended up with straps about 1in wide and each strap was about 50in long. This is obviously much longer than the straps need to be but I really wanted the opulent look of needlessly long straps.
The cutting out and prep-work for this top was horrible; in total, the top has 60 pieces (outer, lining, interfacing, straps). Add in the horrible, slinky, shifty nature of the pebble satin and some scissors that needed sharpening and it was a rage-inducing, back-breaking effort to get all those pieces prepped and ready for sewing. However, in contrast, the actual sewing was pretty straight forward, especially if you’ve got experience making similar tops. It’s a lot of sewing, pressing, top-stitching and then when you think you are finished, you get to do it all again for the lining! In all honesty, I actually really like construction like this – it’s repetitive and instinctive and easy to get lost in the flow of pin, sew, press, sew as you work through the outer and lining.
I was originally a little suspicious about the size chart putting me in a size 2 at the underbust, considering I’m squarely in the US 6-8 range normally, but after doing the US to AUS sizing conversion, realised that a US 2 underbust corresponds exactly with my regular AUS 6 bra size, so that checks out. I then graded out to a 6 at the waist, although when looking at the V-shaped lacing gap I’ve got on my final garment, I could have not bothered grading out at the waist.
When I initially saw the shape of the lacing gap, I was really frustrated that somewhere along the way either I (or the pattern) had messed up and despite planning to have a lacing gap, I’d ended up with a top that almost exactly fit my waist measurements. However, when I went back and remeasured the bottom edge of the top, it’s actually 24.5in – which is almost 4in smaller than the size 6 final garment measurement of 28.3in. So on the plus side, the top is so well structurally engineered I accidentally created a corset that’s given me a 3in waist reduction when worn (my waist measurement is 28.5in, worn with a gap of 1in). On the negative side, it means that my pants are too big because I didn’t realise what had happened until I’d finished the pants! Luckily, the easy fix to that is just to tuck the pants waistband under my top when wearing it – the top is definitely tight enough to keep them there!
I don’t really think that outcome is really a positive or negative or really anyone’s fault, but I it’s worth mentioning. The positive of a lace up back is that you can wear the top as tightly or loosely as you want. There’s definitely no need for me to wear the top with such a dramatic waist reduction but I find it’s more comfortable and secure to wear at that level of tightness. I don’t think I’d feel comfortable or adequately supported in the bust wearing the top with zero ease at the waist, which how it’s designed. I think this is largely to do with the fact that the cups are a smidge too small, resulting in the centre gore not lying flush against my chest and so the effectiveness of the underwires are compromised, resulting in wanting more support through the rest of top. Perhaps with a better fitting bust that issue would be fixed, but hard to know for certain without testing it. Luckily for me (and my sanity over this outfit), I used to be a semi-regular corset wearer and am comfortable tight-lacing down to a 6in waist reduction so I think it’ll be fine.
Whilst tight-lacing to a 3in waist reduction is comfortable for me, I know that not everyone will feel the same way, so I’d be really interested to know whether this is a me issue (and a too small cup issue) or whether a bust of my size really does need the super firm support through the whole top. If anyone has any thoughts on the matter – please weigh in!
Speaking of cups being too small, I genuinely have no idea what went wrong. The cups fit perfectly on my mock-up – the centre front sat beautifully flush against my sternum, and overall my boobs looked great. Despite triple checking all the measurements, I did have to ease the cups into the cup holes (?? what on earth do you call that? Underwire area?) on my final version by about an inch so perhaps that was my issue. Either way, if I made this again, I’d extend the front gore up by about 0.5in and make the H-cup, just to really cover all my bases. As a result, the final look definitely doesn’t sit as well as my mock-up, there is a distinct crinkling in the fabric in the centre of the top (very visible in photos), and I am wearing the straps tighter than I had in my mock-up to keep my bust looking high and perky.
When I first realised this outcome, I was absolutely devastated. I’d spent weeks working on this stupid thing, only to take four steps backwards right as I reached the finish line. Whilst there were no tears shed, I definitely had to take a few days to breathe and muster the energy to continue. With the kindness of time, it doesn’t look as bad now as it seemed when I finished it a few weeks ago. It’s not perfect, but it’s wearable, and I’m sure it’ll look perfectly fine to those that have no idea of the hassle that goes into something like this.
Construction Notes: Pants
Pattern: Very Easy Very Vogue 7975 by Vogue Patterns (picked up in an op-shop a few years ago)
Fabric: Pebble satin
Size: Size 14, graded to a 12 in the waist
After all the headaches and heartbreaks of making my top, I was so relieved to pull out a tried and tested pants pattern to complement it. Or at least, I was until I realised what a nightmare it was going to be to ensure the absolutely enormous pants pieces were cut on grain, and not twisted in any way. I’d previously made that mistake with a pair of Meriam Pants (Muna and Broad) and that twisted and puckered leg seam taunts me every single time my partner wears them.
However, once they were cut, they came together very easily. It’s a really straightforward pattern to use and the wonderful thing about making such enormous pants is that they are a breeze to fit for me – I just have to make sure they fit properly at the waist and the rise is the appropriate length. Unfortunately, my good fortune ended when I finally got to try them on to check the hem length. As one final kick to the teeth from the universe in regardless to this outfit, the fucking pants were too short.
They were “had a fight with my shoes” too short.
They were “we’ve had to make some budgetary cuts” too short.
They were “shein knock-off” too short.
UGH.
Fuck you, slippery pebble satin. My vision was opulence. My vision was drama. My vision involved the illusion of drowning in the amount of pants I was wearing. Instead, I had 7/8 pants. No one has ever looked at a pair of 7/8 pants and thought “wow, that designer spared no expense on these”.
UGH.
The one silver lining to this horrible outcome was that I hated the pants so much that literally anything was going to be an improvement on “disagreement with the manufacturer” length.
So, I decided to go all out and add a clown ruffle.
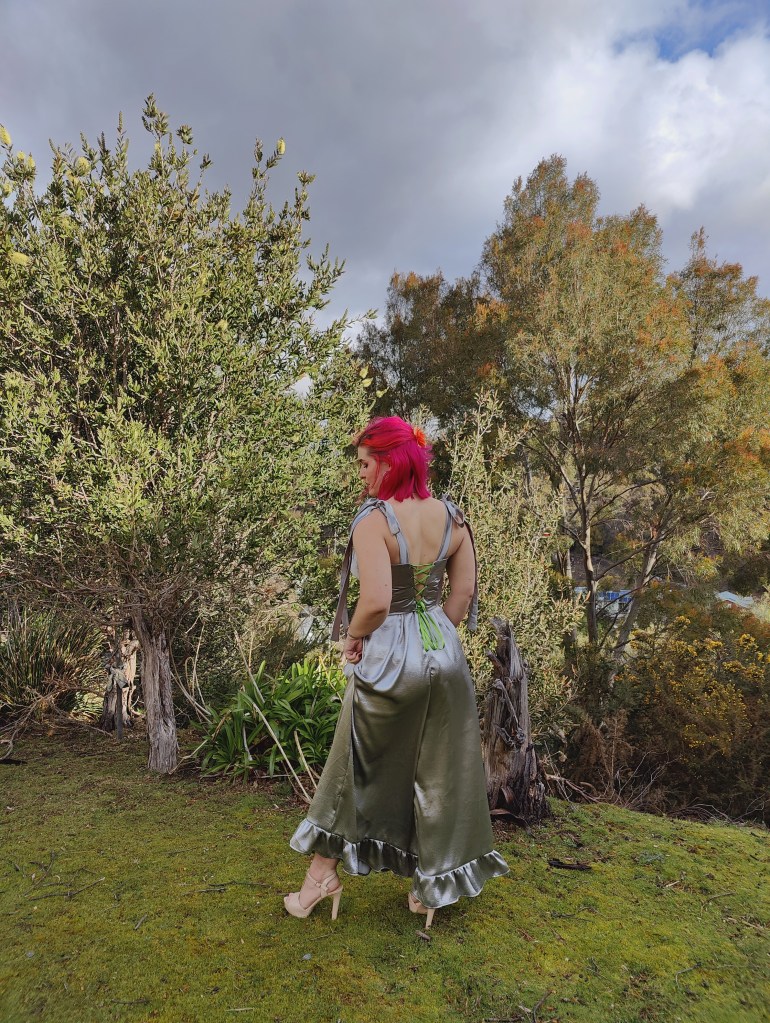
I had one rectangle of full width fabric left (150cm wide) and decided to just turn it into two ruffle hems and hope for the best. My rationale for that was that I figured that gathered ruffle would hide any leg or cuff length discrepancy (as opposed to a plain panel/cuff, which was the other option). I also thought the ruffle might keep them from looking too pyjama-like.
Thankfully, it worked. They gave me drama. They gave me opulence. They gave me “this woman did not buy those pants on temu”. To be fair, they also gave me a little more #clowncore than I would normally be comfortable with, but a win’s a win.
Conclusions
I was done. The beast was finished. I was exhausted. This was one of the most frustrating, arduous, and nightmarish projects I have ever taken on.
But I had proven that I could do it.
And I am proud of myself. Perfectionism is baked so deeply into my bones that there was a time in my life when this outcome would have been unthinkable. My desire to give 120% to everything that I do drives me to excellence in so many areas of my life and cripples me in others. There is nothing about this outfit that is perfect; the top doesn’t fit properly, the straps are uncomfortable, the pants are too loose, the pants were too short (I have a slightly weird clown ruffle as a result), I have more pulled threads that intact ones across both garments, and there’s a stain on the inside of my top because I didn’t wash my thrifted duvet before using it. The final outcome is absolutely nothing like what I originally planned.
And yet.
I have learnt more about the different facets of size inclusivity, gained a deeper understanding of bust fitting, a much better understanding of the overlap between bust fitting in bras and clothes, and proved that I am more patient, more resilient, and capable of more flexibility and lateral thinking than I ever would have given myself credit for.
That feels like a win in a completely new, and really satisfying way.

Leave a comment