
Another wedding to attend, another outfit to make. Here we go again! To be honest, by this point of wedding season I was hoping to just be reusing outfits but alas, nothing I already had quite fit the dress code of this wedding.
My original vision for this outfit was a Calvin Crop dress hack. It’s not a pattern I see a lot of on Instagram, but the ones that I do see are stunning. I’ve also been seeing a lot of strappy back hacks and to me, seemed like the perfect way to dip my toes in the 90s-era bias-cut spaghetti-strap dresses that are all the rage at the moment whilst also having something that’s more aligned to my personal, more-fitted style. After giving the pattern a through fuller-bust scrutiny, I came to the conclusion that it definitely had good merit as a fuller-bust approved pattern, especially with a strappy back hack to help fine tune the fit. The front of the top is very similar in style to the boat-neck dress I made for Christmas last year, which I absolutely loved and was actually very easy to fit with a pretty straightforward FBA. Then, all I had to do was add a slinky bias skirt to the bottom and voila, wedding ready! It was going to be so easy!
Dear readers, it was not that easy.
It would actually the beginning of months of fitting frustrations, googling, tears, many trips to spotlight and more money spent on supplies and patterns than I would like to think about.
It would actually end up being the most frustrating and arduous sewing project I have done in years, potentially ever.
Why didn’t I just give it up as a bad job?
Good question. Short answer, I’m pig-headed and am too proud to admit defeat to a sewing project. Long answer, I felt outraged enough by the paltry effort to include the fuller-bust community on these patterns and took it upon myself to personally prove that it was doable AND provide explanation and guidance to anyone else in this community that falls whim to the lure of beautiful Instagram photos. (why yes, I am an Enneagram Type 1, how did you guess?)
For those that followed along with my Instagram process, you will already know this first vision was a complete dud and that both my Calvin Crop attempt AND the Calvin Crop pattern ended up in the bin, which is the first time in a long, long time that I have been thoroughly defeated by a pattern. But, I still think there were a lot of learnings to be had and I definitely have some strong thoughts on the pattern.
Construction Notes
Pattern: Calvin Crop by Jessilous Patterns (size range 0-32)
Fabric: Pebble satin from Spotlight (outer), thrifted cotton duvet (lining)
Size: Instructions recommend choosing bodice piece as per full bust and all other pieces (back and under bust) as per underbust measurement. According, I chose a size 8 in the bodice, with a FBA and cut a size 0(!) graded out to an 8 at the waist.
I have to be honest, it was when I was working through those sizing choices that I began to feel nervous about my decision. Thankfully, the pattern did confirm that it was graded for a 2in difference between high bust and full bust, so it was easy to choose the size that corresponded to my high bust and accommodate by bust through an FBA – which I based off the FBA I did for my Christmas dress last year, which also felt appropriate and reasonable.
What did not feel reasonable was my underbust being sized out of the size chart at the bottom range. I have an underbust of 28in (which is small, I will admit) but the size 0 corresponded to an underbust of 29in. My waist measurement obviously went back up to fitting in the size 8 (again, reasonable and accepted). Thankfully, because I was going for a strappy look, I was confident that I’d have some wiggle room in fitting the underbust and waist, so tried not to think too hard about it and just cut my size 0 graded out to size 8 top.
The mods I made to accommodate a tie-back were the same as Marlie explains in her (very informative) ingstagram post – the only difference being I extended the side panel 7cm, two more than her recommendation of 5cm.
Knowing that my bust would need all the support it could, I also decided to fully line the top (pattern only calls for a fully-lined under bust piece), add cable-tie boning to the under bust and interface everything with a heavy interfacing. I was fully prepared.
I was thoughtful. I had considered things. I felt like I was prepared to give things a proper go and that I was armed with all the knowledge I would need to get this done.
Alas, I was foiled again.
The fit was horrible.
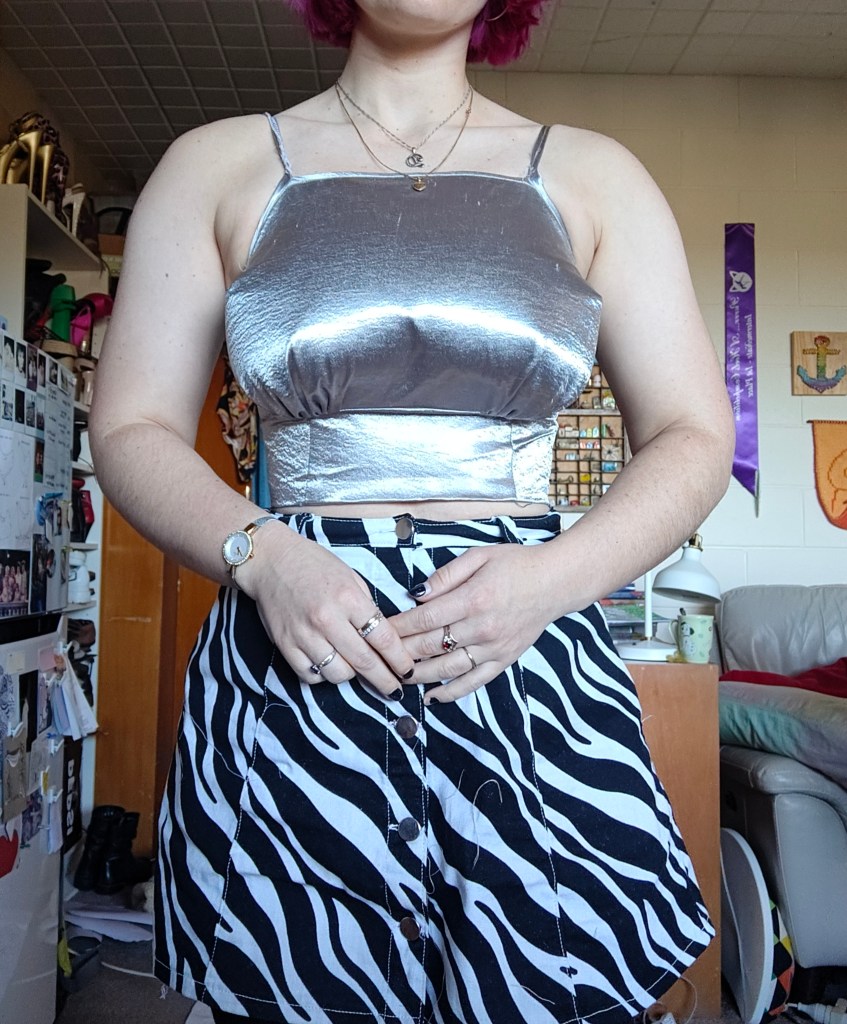
To be fair, the fit at the back was great – I absolutely loved the strappy look at the back and the underbust and waist actually fit very well. Would have never expected to be cutting a size 0 anything, but hey, there’s a time and place for everything apparently. Unfortunately, I did not have the same success with the front.
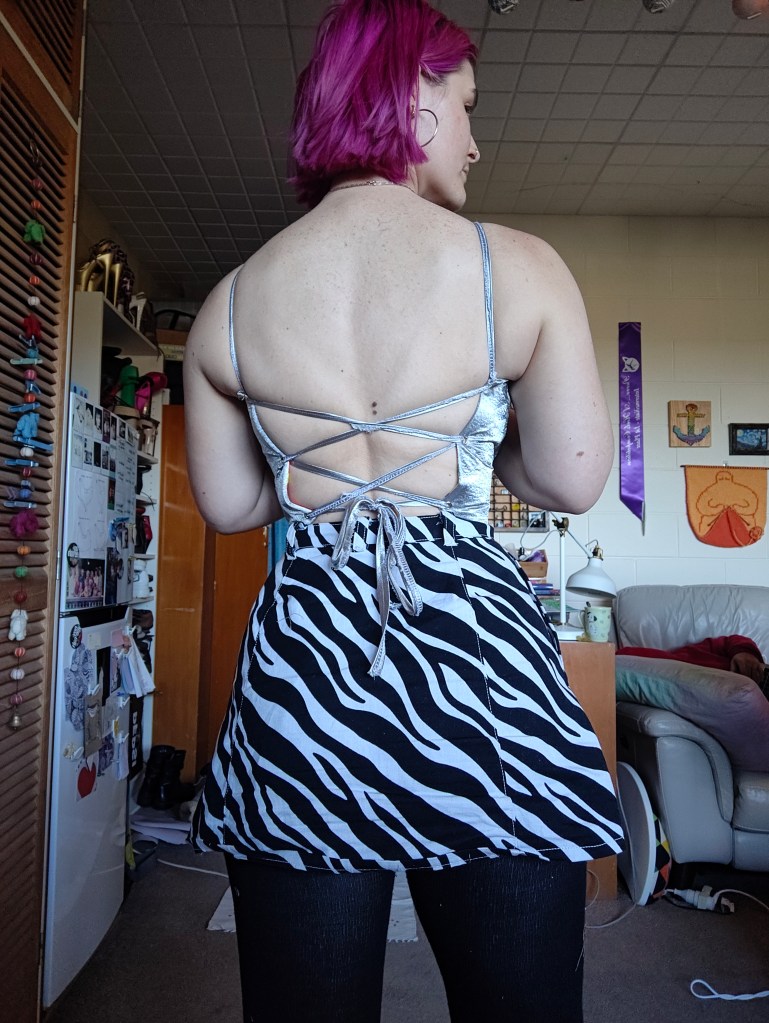
It gaped. Horribly. Right across the top – it simultaneously looked too big and too small at the same time, which is the worst of worsts (I have no photos to prove this, but trust me when I say it was bad).
I tried a few things to fix it – I tried lowering the front, adjusting the strap position, changing the angle of how the arm hole met the top, changing whether the straps were crossed at the back or not, and a few other things. It definitely got better – lowering the front and bringing the straps in towards the middle definitely helped, but did not remove the problem. Fundamentally, the upper bust measurement was too large for my frame and regardless of how I tried to reduce it, I couldn’t seem to remove the gaping across the top. Instagram was so helpful – I had loads of people suggest adjustments to try (also quite a few say they had similar issues and had given up on the pattern) but nothing quite fixed the problem. As a last ditch resort, I put in darts under the arms to try and force the top to sit flatter across my chest. On one hand, it did actually work – the gaping was removed to almost nothing but at the cost of it being so tight at my armpits it was almost painful. It also unfortunately gave the top the appearance of being a “boob sock” (as coined by a friend) and it was that very honest and very truthful assessment of the situation that finally made me pull the plug on this attempt. I gave it my best go, but sometimes you have to admit defeat.
Turns out, the final boss is a boob sock top. Horrifying.
Pattern Review
I’ll just come out and say it – I do not think this pattern is worth the money. It’s not unusable, but for $30 I was expecting a lot more in the way of fit guidance. It’s very clearly a pattern whose success hinges completely on getting a really good bust fit – which is totally fine, but I expected more assistance from the pattern on how to achieve that. The pattern description is very up-front about it being graded to a B-cup (2in difference between upper and full bust) but says there are “there are detailed directions for fit adjustments” in the instructions. When considering buying the pattern, this really heartened me – despite knowing how to do an FBA, every single garment is slightly different and it’s always relieving when pattern designers include fit guidance for that specific pattern.
Unfortunately, I was really disappointed with the guidance provided. The FBA instructions that were given were not actually a true FBA, but a cheats version – i.e. add a bit at the bottom and sides and hope for the best. What actually really frustrated me was a comment in the instructions that spoke to the fact the “adjustments for larger busts were made possible by our pattern testers”. Perhaps this is a misinterpretation on my behalf, but to me that reads that the adjustment instructions (which are not even for a proper and correct FBA) were only included due to the work of pattern testers that fell outside of the size range (B-cup) offered by this pattern. I have a few issues with this:
a) I don’t think it’s fair to be asking your pattern testers to essentially grade for you – if your pattern doesn’t include that size range, I don’t think it’s fair or reasonable to include them in your testing phase.
b) I feel that if you are making and selling patterns for tops that require a good bust fit, you should know how to do an FBA and SBA and include that by default in your instructions and should not be an after thought that is included post testing phase. At the very least, the instructions should speak to an FBA/SBA as an option and link to a good quality tutorial (of which there are about a thousand and one).
c) If your pattern is only drafted to one cup size – I don’t think the pattern should be marketed as “size inclusive”. A size range of 0-32 is fantastic, but if that only caters to one bust size, it’s an incredibly shallow range. In my opinion, I feel that to market a pattern like this (with bust fitting so integral to the pattern success) the designer should be offering 2 cup sizes minimum (B and D; although I’d love to see 3 or 4 bust options).
I will caveat these notes with the fact that I did not reach out to the designer and ask about them. I considered it but to be completely honest, I was so over the pattern by that point and knew that it was not going to be a pattern I wanted to stick with long term. So please take my criticisms regarding testing process and grading with a grain of salt – these are my opinions and thoughts but I did not fact check any of them. I really wanted to like this pattern and I really gave it my all but unfortunately, sometimes you’ve got to cut ties (literally) and move on.
I still had a wedding to attend and I was now two weeks closer and many steps behind. It was back to the drawing board to figure out what on earth I was going to make with the metres of silky pebble satin fabric I had left after my trials of the Calvin Crop. A reasonable and sane decision would obviously be to pull out one of my tried and tested patterns and leave the experimenting for a less time-constrained opportunity. Unfortunately for my stress levels, I was feeling neither sane nor reason and instead decided to try my luck with the Instagram beloved Rose Café Bustier, which I’ll be covering in my next post.

Leave a comment